Hello folks, through this blog, I will let you know how you can easily upload your files on Azure Blob Storage using React and Blob storage package. But before that, you have to understand what both Azure and Blob storage is so let's begin.
What is Azure?
Azure is a cloud platform provided by Microsoft and is one of the cheapest clouds. Although it is not always the beginner's choice, it is very economical and has all the features of other cloud platform services.
What is blob storage?
Blob storage is a storage for blobs of data, big and small. Historically it stood for 'Binary Large Objects' although that was mostly used in SQL circles for storing data in databases. Regardless of the origin, blob storage (aka S3 at AWS) is a staple of modern apps.
Installation
Now before starting with the workflow of Azure's file upload you have to install a react application. You can use vite to setup a react application as it is one of the fast and most optimized package bundlers.
Type the below commands in terminal/powershell to get started.
npm create yarn azure-upload --template react
cd azure-upload
npm install
npm run dev
Now install the following packages using CLI to add support for:
Azure blob service
File uploading component (Filepond)
npm install @azure/storage-blob filepond react-filepond filepond-plugin-file-encode filepond-plugin-file-validate-type filepond-plugin-pdf-preview
Development of upload Component
Now we are going to:
Creating a component to upload files
Creating a service to manage the view state for the uploads
Creating a hook that will take the file object from the state and upload the file in Blob storage using the package
@azure/storage-blob
In App.jsx, paste the following code:
import { useState, useRef } from "react";
import { fileUpload } from "./useAzureFileUpload";

// Filepond Plugin imports
import { FilePond, registerPlugin } from "react-filepond";
import FilePondPluginFileValidateType from "filepond-plugin-file-validate-type";
import FilePondPluginFileEncode from "filepond-plugin-file-encode";
import FilePondPluginFilePreview from "filepond-plugin-pdf-preview";

// FilePond styles
import "filepond/dist/filepond.min.css";
import "filepond-plugin-image-preview/dist/filepond-plugin-image-preview.css";

// Register the plugins for usage
registerPlugin(
  FilePondPluginFileValidateType,
  FilePondPluginFileEncode,
  FilePondPluginFilePreview
);

function App() {
  const [pdfFile, setpdfFile] = useState([]);

  const filePondPdfRef = useRef(null);

  const handleSubmit = async (e) => {
    e.preventDefault();
    const containerName = "container-name";

    const fileString = await fileUpload(pdfFile, containerName);
    console.log("url string:", fileString);
  };

  return (
    <main
      style={{
        width: "50%",
        margin: "auto",
      }}
    >
      <h1
        style={{
          textAlign: "center",
          fontSize: "40px",
        }}
      >
        Azure File Upload
      </h1>

      <form method="post" onSubmit={handleSubmit}>
        <FilePond
          fileSizeBase={1000}
          checkValidity={true}
          allowFileTypeValidation={true}
          allowFileSizeValidation={true}
          allowFileEncode={true}
          chunkUploads={true}
          acceptedFileTypes={["application/pdf"]}
          files={pdfFile}
          onupdatefiles={setpdfFile}
          allowMultiple={false}
          maxFiles={1}
          name="files"
          ref={filePondPdfRef}
          onaddfile={(error, fileItem) => {
            if (error) {
              console.log(error);
            }

            if (fileItem.file.size > 1000000) {
              console.error("File size is too large");
            }
          }}
          oninit={() => console.log("FilePond instance has initialised")}
          labelIdle='Drag & Drop your files or <span class="filepond--label-action">Browse</span>'
        />
        <button
          type="submit"
          style={{
            width: "100%",
            height: "50px",
            backgroundColor: "#225BD8",
            color: "white",
            border: "none",
            borderRadius: "8px",
            marginTop: "10px",
            fontSize: "20px",
          }}
        >
          Submit for file
        </button>
      </form>
    </main>
  );
}

export default App;
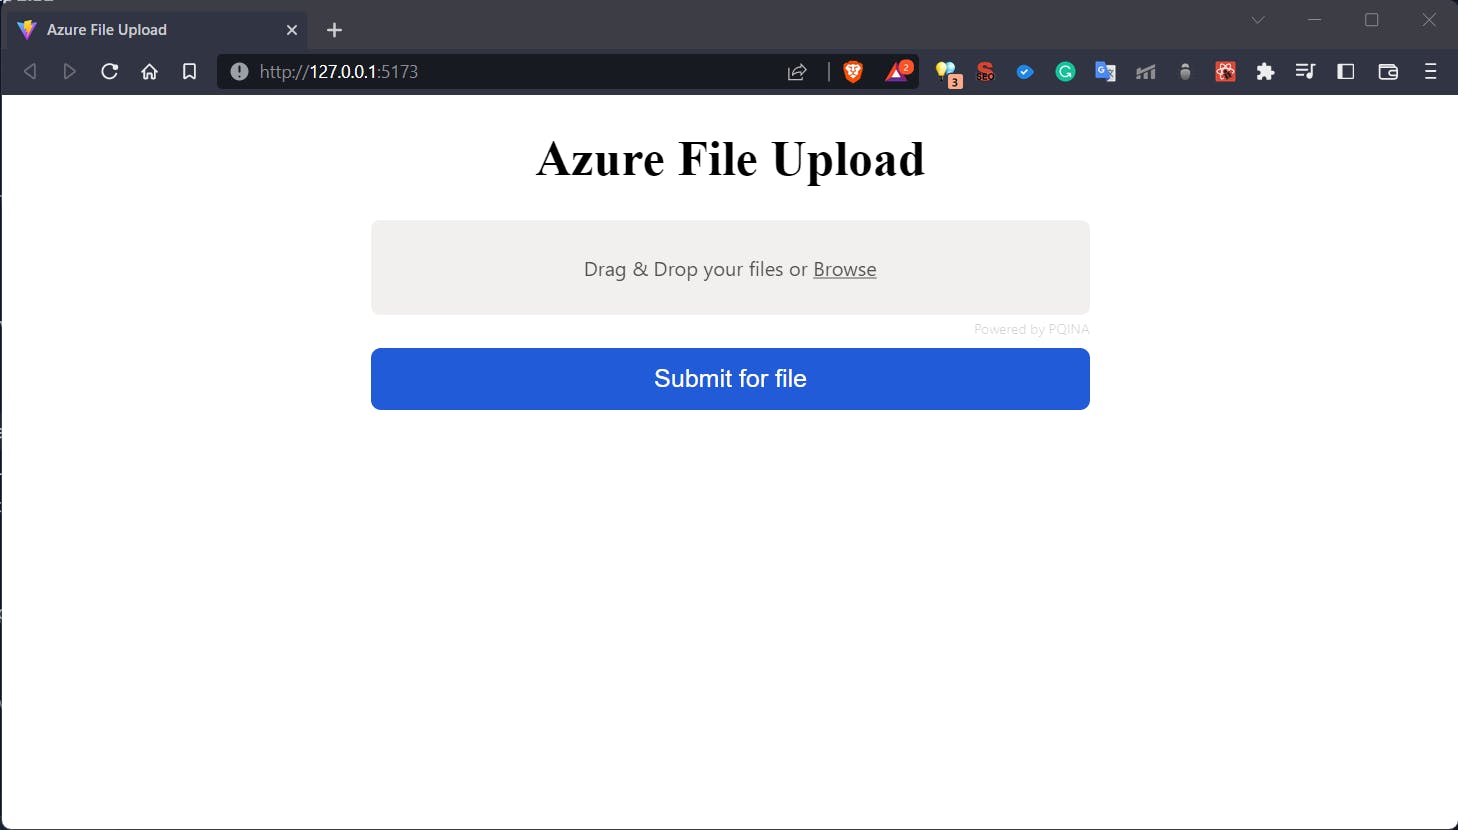
The following code will show you the Filepond image uploading plugin and a submit button which will take the pdf and uploads it to the azure server using the hook that we create.

Configuring Azure Portal for Storage Account
Visit portal.azure.com to access the portal. There you can search for a storage account and create the service.

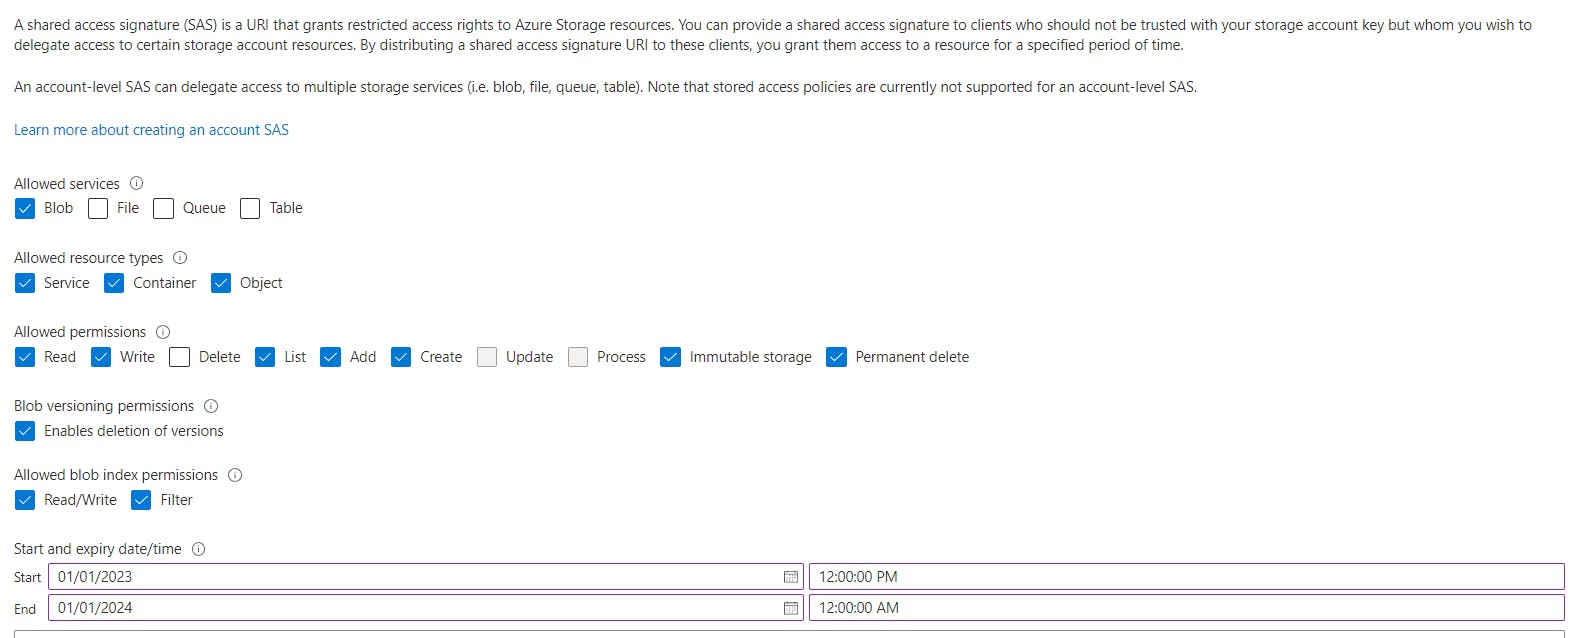
After creating the service, you have to generate the SAS (Shared Access Signature) token to access that storage account. To generate the token go into the storage account and click on Shared Access Signature from the sidebar and configure it this way to work perfectly. Also, give it the expiry time properly to work.

After that copy the SAS token and save it somewhere to connect our blob-storage hook with Azure's storage account service.
Now create a file with name fileUpload.js and paste the following code in it
import { BlobServiceClient } from "@azure/storage-blob";

/**
 *
 * @param {file} file
 * @param {string} containerName
 *
 * @returns {string} fileString
 */
async function fileUpload(file, containerName) {
  try {
    let storageAccount = "<YOUR_STORAGE_ACCOUNT_NAME>";
    let sasToken = "<YOUR_SAS_TOKEN>";

    const blobService = new BlobServiceClient(
      `https://${storageAccount}.blob.core.windows.net/${sasToken}`
    );

    const containerClient = blobService.getContainerClient(containerName);

    const blobClient = containerClient.getBlockBlobClient(file[0].file.name);

    const options = {
      blobHTTPHeaders: {
        blobContentType: file[0].file.type,
      },
    };

    const res = await blobClient.uploadBrowserData(file[0].file, options);

    if (res) {
      const fileString = `https://${storageAccount}.blob.core.windows.net/${containerName}/${file[0].file.name}`;
      return fileString;
    }
  } catch (error) {
    throw Error("Error uploading file to Azure");
  }
}

export { fileUpload };
And voila, you can now upload your pdf to Azure's storage account using react js. You can also this custom hook to upload images and other types of files. You can also check out the repository of the above blog.
Thank you! for reading, please leave your comments if any ✌️
Don't forget to bookmark this blog for the future 📌
Connect with the author: