

Having an SSL certificate on your website is essential as it ensures the security of your website when you perform data. The certificate shows the credibility of the website. It also helps improve search engine ranking as Google has decided it as one of the ranking factors.
Hey developers👋, in this article we will be learning how to configure a free SSL certificate for your website on the Nginx server using Let's Encrypt and Certbot. This will help us enable the security certificate to the domain address and request the secured HTTP request.
If you have not yet installed SSL certificates on your server, you should do so now. You may be familiar with Let's Encrypt and Certbot, but if not here is what they do:
What is Let's Encrypt & Certbot?
Certbot is a free, open-source software tool for automatically using Let’s Encrypt certificates on manually-administrated websites to enable HTTPS. Let's Encrypt certificates expire after 90 days and can be renewed by requesting a new certificate via Certbot.
Nginx Configuration!
First, update your server, so that if there is any update available of the services, it will be implemented. To update the server, type the following commands:
sudo apt-get update && sudo apt-get upgrade -y
After updating, make sure that Nginx is installed on your server. To check for installation, press this command:
nginx -t

If it's not already installed, you can run the command above to install it:
sudo apt-get install nginx -y
Now go to cd /etc/nginx/sites-available/ and edit the default Nginx configuration file or make a new one. Now open the file using nano default. After opening the nano editor, check if the field server_name is filled with your domain name. If not, add the domain name of the website there.
server_name www.example.com
If you've made the changes, save the file using ctrl+o and exit the file using ctrl+x. After that, test the configuration by using the command:
sudo nginx -t
If everything is OK, restart the nginx using the below command:
sudo systemctl restart nginx

Let's Encrypt Certbot Installation⚡
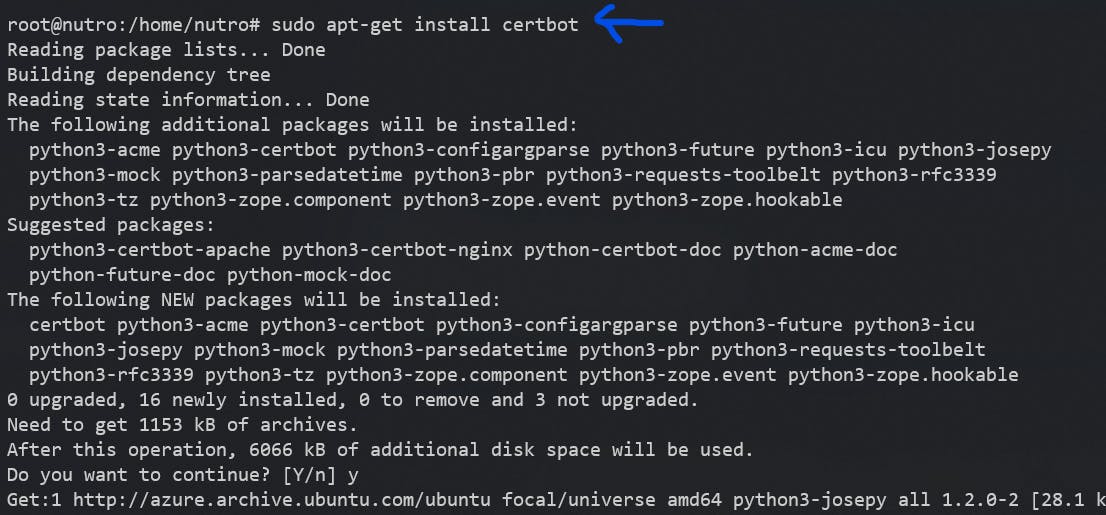
Now that the Nginx is configured successfully, we can proceed further with the Certbot installation for the SSL certificate. First, install the Certbot package:
sudo apt-get install certbot
Now install the Certbot nginx plugin for configuring the Certbot on Nginx machine.
sudo apt-get install python3-certbot-nginx

After installation, update and upgrade the machine using this command:
sudo apt-get update && sudo apt-get upgrade -y
After the upgradation is finished, execute the following command to create the certificate. This command will also change the Nginx configuration file for redirecting from HTTP to HTTPS and update the certificate locations.
sudo certbot --nginx -d example.com -d www.example.com
Answer the prompts which will appear and you'll get your SSL Certificate 🎉

Test Domain SSL Certificate
Once the certificate is generated successfully, you can test the authenticity and score at SSLLabs.com. Copy and paste the URL in the browser below, replacing your domain name.
https://www.ssllabs.com/ssltest/analyze.html?d=www.example.com

Do not expect the SSL to be a perfect A+ score as I haven't fully configured the Nginx with additional security setup.
Conclusion
Congratulations! You have successfully configured Certbot on your Nginx server with a Let's Encrypt SSL certificate. Your site should now be secure and ready for visitors and search engines to see.
Thank you! for reading, please leave your comments if any ✌️
Don't forget to bookmark this blog for the future 📌
Connect with the author: