

Table of contents
It is a beginner guide on how to move the first steps with only the basic Git commands you need, to contribute to open source and open your first pull request.
To be fair, you could technically open a Pull Request (or PR for short) without writing a single command in the terminal, hence without using git🎊. But I think, learning Git is the first step to starting your open-source journey. I would expect a decent developer to know Git as it's a powerful and widespread tool you're going to use every day.
Git Working Area
Before starting to contribute, you have to understand a basic concept that Git uses under the hood. When you work on your local machine, that area is considered the local directory or working directory. After completing your changes, you have to put your code into the staging area where you can check your code, and if it requires changes, you can move it back to the working area. After everything is complete and checked by you, move the code into the repository or HEAD which is the exact copy of the code present in the remote repository like GitHub.
Your First Contribution:
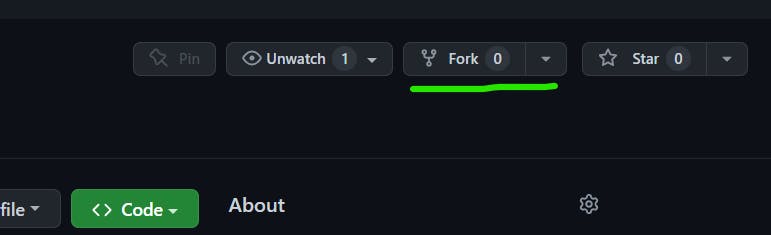
Let's go to GitHub and fork any open-source repository by clicking on the fork button. As a result, GitHub will create an exact copy of that repository but on your account. The reason is that you might not have the write access to the original repo but for sure you have to write access in your local copy.
The next step is downloading that repository on your local machine. The first git command you are going to use: git clone.
git clone https://github.com/<your-username>/<respository-name>
As the name suggests this command downloads the code From the remote repository and creates a copy on your local machine.
Now that you clone the repo, you want to contribute to the repository. To contribute, you better be in a separate branch to avoid any conflicts. That's why we're going to introduce the next command which is git checkout. This command allows you to move between branches and if you add the option -b, it will create a new branch.
git checkout -b <branch-name>
Now that you have checkout into your new branch, make changes that you want to create or add to the repository. After implementing the changes, save all the files that you have edited and type the command git status to check the status of the files that you've edited.
git status
After that type git add . to add all the files which are modified to the staging area and type git commit -m "your-message" to commit the snapshot into the HEAD.
git add .
git commit -m "my first commit"
Committing a meaningful message is important as it helps the reviewer or maintainer of your PR know what have you done in it. Now that you have done with changes, take a pull from the upstream.
Upstream means the original repository that you forked initially. Generally, it is a good practice to take the pull from the upstream before making the pull request.
Before taking the pull from upstream, first, check whether the upstream is connected to your local repository. To check that, you can use the command:
git remote -v
If it shows then it is great or else you can add using the command: git remote add upstream https://github.com/<original user's name>/<repo name>.
Now you can take the pull from the upstream and push your branch into the repository that you've forked by typing the following commands:
git pull upstream main

git push origin <branch-name>
After that, visit your repository page and there a popup appears saying: open a pull request. Click on that, give some extra details of what you've done in your PR, and click the create pull request button.
Viola, you have successfully created your first pull request and now you have to wait for the maintainer to review and merge it.
Here are 2 of my repositories where you can start your first open-source journey:-
Thank you! for reading, please leave your comments if any ✌️
Don't forget to bookmark this blog for the future 📌
Connect with the author: